Introduction
A dry winter morning in Seattle: I grind and the grounds leap out of the hopper like confetti, clinging to the dosing cup and my sleeves. The pour-over smells citrusy and bright, but the cup ends up thin—pithy lemon without the honey. Two weeks later, the rain returns. The grinder hums, no static at all, but my V60 starts dripping like molasses. Same beans, same 1:16 ratio, wildly different cups.
I know this sounds obsessive, but bear with me. Ambient humidity changes how coffee grinds, how it flows, and how it extracts. The short answer is low humidity boosts static and can cause under-extracted, sharp cups; high humidity promotes clumping and slower flow that can push bitterness. The interesting answer is you can fix most of it with two clicks on the grinder, 0.1 g of water (RDT), a 10–15 second bloom tweak, and a little patience. Okay, here’s where it gets interesting.
What Humidity Actually Does: Static, Clumping, and Flow
Coffee is hygroscopic—it trades moisture with the air. At low relative humidity (RH), say 25–35%, grounds get bone-dry and pick up static. You’ll see grounds “snow” from a
or
, fines sticking to the chute, and uneven distribution in your filter or portafilter. At high RH, 65–75%, grounds absorb surface moisture, aggregate, and resist flow. Neither is “bad,” but both change extraction kinetics.
Mechanics in plain English:
- Low RH (<35%): More static and fines fly. The bed can become patchy, encouraging micro-channeling. Water finds the gaps and rushes through, leaving a sour, hollow cup.
- High RH (>65%): Grounds clump. The packed bed resists flow, increasing contact time. You may get fuller body but also bitterness if you don’t adjust.
- Middle RH (40–55%): The Goldilocks zone—predictable dosing, steady flow, easier repeatability.
My quick tests: Brewing Olympia Coffee’s Ethiopia Kossa Geshe on a Hario V60 02, 20 g in, 320 g out (1:16), 203°F water. On a 32% RH day, with no tweaks, total brew time was 2:15 and the cup read 1.26% TDS, ~18.6% extraction yield (VST refractometer—yes, that refractometer). Lemon-lime and white tea, but thin. On a 74% RH day, same grind, brew time crawled to 3:15 with TDS 1.44%, ~21.2% EY—orange marmalade, deeper sweetness, slight bitter tail.
Actionable takeaway:
- Buy a $10 hygrometer and set it near your grinder. Treat RH like you treat brew temp: a real variable. If RH 65%, plan for clumping and slower flow.
- Keep gear dry but not bone-dry. Don’t park your grinder under a range hood or next to a humidifier.
Filter Brewing: Adjusting Bloom, Grind, and Agitation by RH
Pour-over is a magnifying glass for humidity’s mischief. Paper filters and a conical bed amplify flow changes. Luckily, small moves fix most issues.
When It’s Dry (RH <35%)
What you’ll notice: grounds flying everywhere, patchy bed, fast draining, and cups that smell like lemon zest but taste watery—bright without sweetness. The sound of water meeting grounds is a hiss that turns into a quick trickle.
What to change:
- Ross Droplet Technique (RDT): Mist 0.1–0.2 g water onto 18–20 g beans before grinding (one fine spritz from a lab mister or a single droplet rolled over the beans). This kills static without wetting the burrs.
- Grind: Go 1–2 clicks finer on a Comandante C40 (or 1–2 steps finer on an Encore ESP). You’re compensating for fast flow.
- Bloom: Increase bloom from 30 to 45 seconds with 2–3 gentle stirs to even saturation. Use 2–3x dose as bloom water (e.g., 40–60 g for a 20 g dose).
- Temperature: Keep it in the SCA range—200–205°F (93–96°C). 205°F isn’t magic—here’s what’s happening at that temperature: hotter water accelerates extraction of acids and aromatics. If flow is too fast, the extra heat helps pull sweetness in time.
Recipe example: Hario V60 02, 20 g coffee, 320 g water, 203°F. Bloom 60 g for 45 s with a gentle stir, then two pours to 200 g at 1:15 and to 320 g at 2:00. Total time target 2:45–3:00.
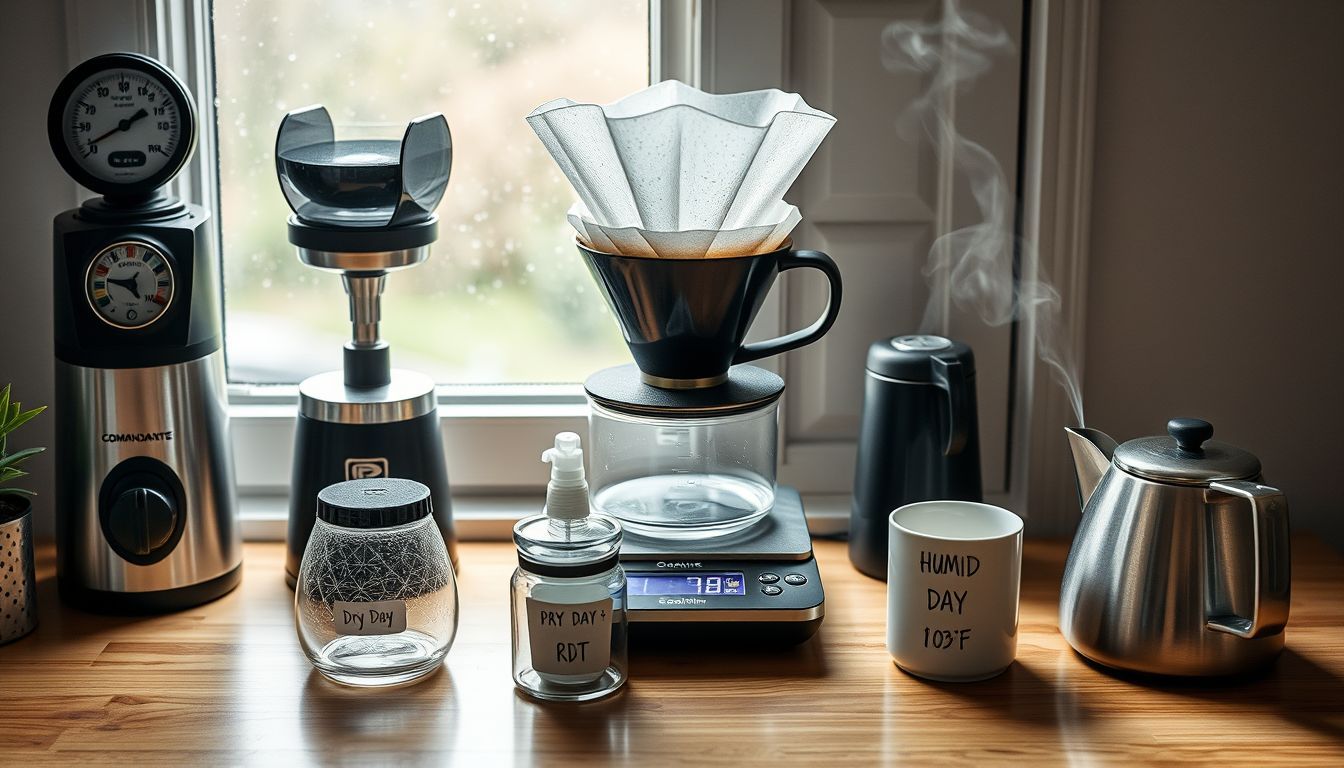
Expected cup: perfumed steam (jasmine, lemonade), medium-light body, a clean snap that resolves into honey rather than sharp pith. V60 pour-over brewing with visible steam and bloom during dry weather conditions
When It’s Muggy (RH >65%)
What you’ll notice: thick, syrupy initial drip, stalls mid-brew, and cups that smell like caramelized orange but risk an aspirin bitterness in the finish.
What to change:
- Distribution: After grinds hit the filter, tap the dripper gently or use a thin chopstick to break clumps. No aggressive stirring—you’ll over-agitate.
- Grind: Coarsen 1 click on the Comandante (or 1 step on Encore). Aim to regain flow.
- Bloom: Shorten to 25–30 seconds with minimal agitation—just a swirl. Use 2x dose bloom (40 g for 20 g dose).
- Temperature: Drop toward 198–200°F (92–93°C) if you’re already running long; this lowers bitterness risk.
Recipe example: Kalita Wave 185, 24 g coffee, 384 g water (1:16), 200°F. Bloom 48 g for 30 s, then three equal pours at 0:45, 1:30, 2:15. Target time 3:15–3:30.
Expected cup: warm aromas of orange blossom and panela, rounder texture, chocolate-laced sweetness without the grippy finish.
Actionable takeaway: Pair a grind change with a bloom change. Dry day = finer + longer bloom. Humid day = coarser + shorter bloom. Keep ratio constant until flow is fixed.
Espresso: Taming Channeling and Stalls When the Air Shifts
Espresso is hypersensitive because pressure exaggerates small differences. Your Breville Barista Express, E61 with flow control, or La Marzocco Linea Mini will all “feel” the room.
Low RH (Dry Days)
Symptoms: staticy grounds, fluffy mound in the portafilter, random spurts during extraction, and shots that smell promising but taste like sour cherry with a watery body.
Fixes:
- RDT: 0.05–0.1 g water onto 18 g beans. Yes, that tiny. It dramatically reduces static with grinders like the DF64 or Niche Zero.
- Distribution: WDT (Weiss Distribution Technique) with thin needles to break voids, then a firm 15–20 kg tamp. Consider a puck screen to damp flow if channeling persists.
- Grind and yield: Go slightly finer and keep ratio the same. Try 18 g in, 36 g out in 27–32 s at 200°F (93–94°C). If you were running 1:2.2, pull back to 1:2 for structure.
- Pre-infusion: If your machine allows, extend to 6–8 seconds at 2–3 bar (or use a gentle lever pre-wet). This saturates dry pockets.
High RH (Muggy Days)
Symptoms: clumpy grind, puck that feels tackier, slow early flow turning choked mid-shot, bitterness lurking.
Fixes:
- Break clumps: RDT optional; too much water here makes paste. Instead, WDT thoroughly.
- Grind and yield: Coarsen a notch and keep the same dose to avoid overdosing a tight bed. 18 g in, 36–40 g out in 25–30 s at 198–200°F (92–93°C).
- Pre-infusion: Shorten to 2–4 seconds. You’re preventing early over-extraction.
- Headspace: If you’re often stalling, drop dose by 0.5–1 g to increase headspace and reduce resistance.
Real-world example: On a 72% RH afternoon, pulling a washed Kenya AA (Onyx Southern Weather’s Kenyan component) on my Linea Mini at 18 g in, 38 g out. With my dry-day grind, I choked at 15 seconds. Coarsened a half-step, shortened pre-infusion to 3 seconds, and lowered temp to 199°F. Result: blackcurrant and grapefruit, syrupy but not bitter.
Actionable takeaway: Choose one lever at a time: grind first, then pre-infusion, then temperature. Keep dose and ratio steady until flow normalizes.
Storage and Daily Calibration: Keeping Beans Consistent Through Weather Swings
I spent weeks convinced that humidity was only a grind problem. I was wrong. It also nudges bean behavior day to day. Roasted coffee contains a little moisture and CO₂; it will exchange with the air, especially in open hoppers.
Simple safeguards:
- Single-dose instead of hopper. Measure 18–20 g per shot or 20–30 g per pour-over. Closed amber jars like Fellow Atmos (without vacuum pumping for delicate coffees) or simple mason jars work. Open only when needed.
- Location, location: Keep beans away from a steamy kettle, dishwasher vents, or windows. Microclimates are real—my hygrometer reads 8–10% higher RH by the sink.
- Quick calibration routine: Each morning, pull one test brew. If V60 drains 20–30 seconds faster or slower than usual, adjust grind 1 click the opposite direction and re-check. For espresso, if your 18 g dose yields 36 g before 25 s, grind finer; if it’s still crawling at 10 s, coarsen and reduce pre-infusion.
- Filters matter: Paper can absorb humidity. Store filters in a sealed bag. On muggy days, pre-rinse with hotter water (205°F) to clear any paper taste and normalize flow.
Actionable takeaway: Tape a tiny RH chart on your grinder: “65% = break clumps + coarser + shorter bloom.” Future-you will thank you.
A Simple At-Home Humidity Experiment (That Won’t Get You Banned from the Kitchen)
I wondered if this was actually true, so I tested it—under supervision, because my partner David banned open-beaker days after “the refractometer incident.” Two Saturdays, two weather patterns.
Coffee: Heart Roasters Ethiopia Worka (washed). Grinder: Comandante C40. Brewer: Origami dripper with Kalita 155 filter. Ratio: 18 g in, 288 g out (1:16). Temps: 202°F both days.
Day 1 (RH 33%): No RDT, baseline grind. Bloom 40 g, 30 s, light swirl. Total time 2:10. TDS 1.24%, EY ~18.2%. Aroma: lemon peel, jasmine. Flavor: vibrant but hollow—think lemonade without sugar. Texture: thin, quick finish.
Adjustments: RDT 0.15 g water, 2 clicks finer, bloom 60 g, 45 s with a gentle stir. New time 2:50. TDS 1.34%, EY ~19.7%. Aroma intensified; flavor gained honeyed sweetness; texture moved to silky.
Day 2 (RH 71%): Same baseline grind. Bloom 40 g, 30 s. Total time 3:25. TDS 1.46%, EY ~21.5%. Aroma: orange marmalade, floral honey. Flavor: sweet upfront, aspirin-bitter finish.
Adjustments: 1 click coarser, bloom 25 s, minimal swirl, 198°F water. Time 3:00. TDS 1.38%, EY ~20.6%. Bitterness gone; cup tasted like mandarin and white peach with a medium body.
Actionable takeaway: Replicate this with one coffee you like. Keep ratio and temp fixed, change only one variable at a time based on RH. Write three words for each cup—aroma, flavor, texture—and adjust in 1-click steps.
Troubleshooting Cheat Sheet by Symptom
- Sour, thin cup on a crisp morning: RH likely low. Use RDT (0.1–0.2 g), go 1–2 clicks finer, lengthen bloom to 45 s, keep temp 200–205°F.
- Bitter, heavy cup on a rainy night: RH likely high. Break clumps, 1 click coarser, shorten bloom to 25–30 s, drop temp to 198–200°F.
- Espresso spurts and channels on a dry day: RDT 0.05–0.1 g, thorough WDT, extend pre-infusion to 6–8 s, hold 200°F.
- Espresso stalls on a humid day: WDT more, coarsen one notch, shorten pre-infusion to 2–4 s, reduce dose by 0.5–1 g if necessary.
Actionable takeaway: Don’t change everything at once. Start with grind. If you’re within 20–30 seconds of your normal brew time for filter or 25–32 seconds for a 1:2 espresso, use agitation and temperature as the fine scalpel.
Conclusion
Anyone who tells you humidity doesn’t matter is selling something—or brewing in a climate-controlled bunker. You don’t need a weather station, just a pocket hygrometer and the habit of one small adjustment at a time. Tomorrow, check your RH. If it reads under 35%, give your beans a single mist and lengthen the bloom. If it’s over 65%, break the clumps, coarsen a click, and lower the temp a degree or two.
Brew, listen for the gentle hiss, and inhale the steam—the lemon oil, the cocoa, the jasmine. When the cup tastes like you meant it to, not like the weather forced your hand, that’s you and your coffee taking the climate back. And if you catch yourself weighing 0.1 g of water for RDT at 6 a.m., know you’re in good company—I tested this more times than I’m willing to admit.